Articles about Peony how to
Showing posts with label how to. Show all posts

Tuesday, December 28, 2021

2021 How To Cut Back a Tree Peony


Tree Peony with Dead Foliage

After a while that beautiful tree peony goes from gorgeous to gross, and you just want to erase it from your landscape. In order to get it looking decent again (and ready for spring), you need to cut it back. Cutting it back also removes parts of the stem that won't be needed next season and all of the dead foliage, which could harbor disease. The parts of the stem you will want to remove are any bloom stems that either bloomed or failed to bloom, but you don't want to cut off too much, as you don't want to lose any growth buds, which is where the peony will start to grow from in the spring.


Cut Tree Peony Bloom Stem 1" Above Top Bud

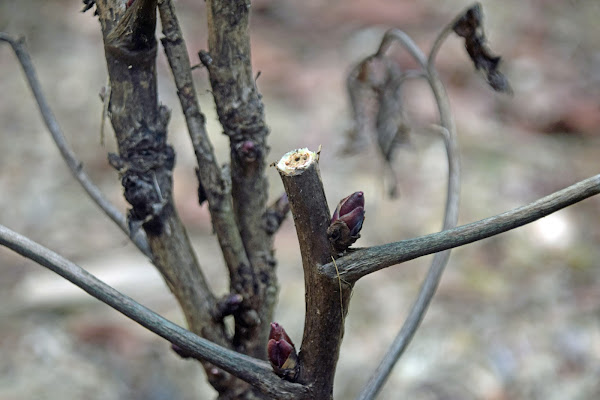
There are different ways you can cut back your peony stems and different methods of removing the foliage. I'll go over both of them here. The first way of cutting back the bloom stems is to cut the bloom stem back to 1 inch above the top growth bud on the stem. Using your pruners cut the stem at an angle (to prevent water pooling/damage) 1 inch above the leaf joint that contains a rounded, sometimes pinkish growth tip.


Tree Peony After Bloom Stem Cut 1" Above Top Bud


Tree Peony Bloom Stem Cut Back

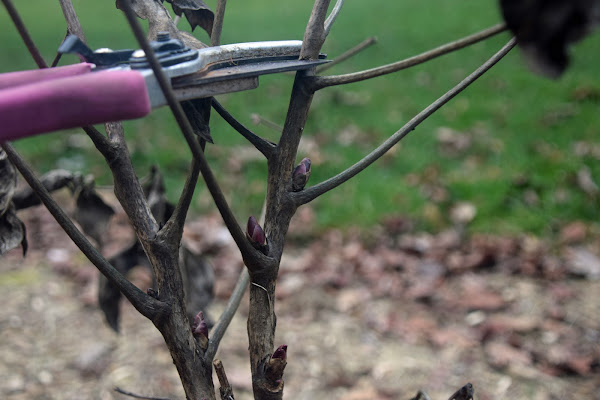
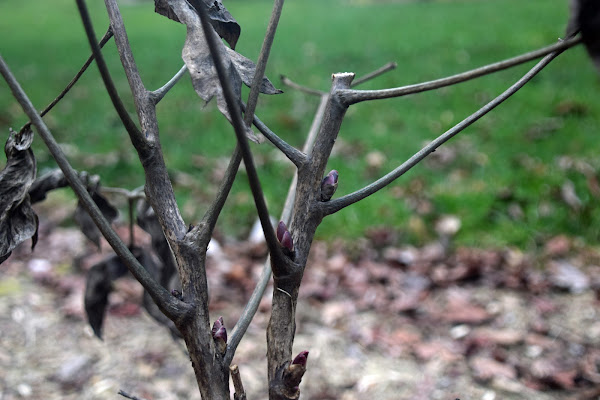
After the bloom stem has been cut off, next the foliage stems should also be pruned. The foliage stems can be cut back to about 2 inches to leave a pointy, pokey hardened foliage stem to protect the growth bud, while the dead leaves will be removed and thrown away. These hard stems can be useful if you have a problem with animals that like to browse your tree peonies (like deer). It is not a huge obstacle, but an obstacle nonetheless, and may help protect your peonies from hungry animals.


Cut Tree Peony Leaf Stems Down to 2"

After one foliage stem has been cut back, continue cutting back all of the foliage stems on that main stem to 2 inches as well. As you are cutting the foliage, make sure you are placing it in a bucket or bag for disposal. Don't leave the dead stems and foliage on the ground underneath the tree peony. This will help with plant hygiene and health.


Cut Tree Peony Leaf Stems Down to 2"


Dispose of Tree Peony Stems & Foliage


Cut Tree Peony Bloom Stem Just Above 1 Segment Higher than Top Bud

Another way to cut back the peony bloom stem is to make your cut a little higher on the tree peony stem, one leaf segment above the top bud. This may be a useful method if you are concerned about severe cold or dieback in your peony stems. Here in my garden in the South, we don't usually have to worry about temperatures that cold. Some Northern states keep snow cover all winter to protect the peonies. However if you live in an area with extreme cold and no snow cover, you may be a bit more concerned about stem dieback. Or perhaps you've experienced stem dieback in the past, in which case this maybe the method that you choose.


Tree Peony After Bloom Stem Cut
Just Above 1 Segment Higher than Top Bud


Remove Foliage Stems
from Tree Peony

Pull Down Tree Peony Foliage Stem to Pop Stem Off

Another method of removing tree peony foliage stems is pretty easy and doesn't require any clippers. You simply pop them off by pressing the foliage stem in the opposite direction than it was growing. The entire foliage stem removes cleanly. I like to use this method for any foliage segments that do not have a growth bud in them. Since there is no growth bud that needs protection, the entire foliage stem can be removed, leaving the tree peony a bit more clean.


Tree Peony After Foliage Stem Popped Off

You can then continue cutting back any foliage stems with growth buds at the base. Keep repeating these processes until you have cut back all bloom stems and removed or cut back all foliage stems as well. After you are finished with the entire tree peony plant, it will be back to stems only, be so much cleaner, and ready for spring!! Happy Garden Cleaning!!!


Cut Back Foliage Stems to 2" to Protect Growth Buds


Tree Peony Cleaned Up & Ready for Spring!

Friday, May 22, 2020

2020 How to Make a Peony Support Ring from a Tomato Cage


Peony 'White Cap' in Dire Need of Support

Day after day, I just couldn't take looking at it this way anymore. This Peony 'White Cap' just kept blooming and blooming. I thought at some point it would just quit blooming and I wouldn't have to watch the blooms keep opening on the ground, but it just kept blooming and blooming. Even days after I went to the store to purchase a tomato cage did I finally get around to messing with this plant, and it was still blooming (granted it was almost finished, but still blooming).


Carefully Putting Tomato Cage on Peony 'White Cap'

I thought I might need to trim the bottom of this tomato cage to make it a suitable support for my Peony 'White Cap', but this peony was so tall and my tomato cage was so short, that it worked out just right! I purchased the 33-in Galvanized Steel Wire Round Tomato Cage from my local home improvement hardware store - Lowe's. This particular tomato cage came with 3 support rings on it, which did make it a little tricky to get on my plant, but I was able to finally get it on there. First I gathered up all of the stems, and put them as close together as possible so that I could fit the flowers through the bottom ring of the tomato cage, then the second ring.


Peony 'White Cap' Fully Supported

After that the foliage was kind of in the way. So I had to wiggle and jiggle the tomato cage on a bit, carefully putting each leaflet through the bottom ring of the cage. I was able to start pushing the cage into the ground a bit, adjusting the leaves up through the cage, pushing the cage down a bit, adjusting the leaves, repeating until the tomato cage is at the desired height needed to support the peony. I must say this Peony 'White Cap' does look so much better when the flowers are up higher, making them easier to see their lovely contrasting blooms and smell their fragrance!


Peony 'White Cap' The Next Day

I will also admit that this was not the most ideal time to add support for this peony. Next year I will put the support out before the foliage emerges so that it can grow into the support rings naturally (and I can help make sure that it does). The peony seemed to work great in this size tomato cage, but it looks like Lowe's also sells a short 30" version with only 2 support rings if you think that might be more to your liking. As you can see I took a photo of the plant the day after I added the support and some of the foliage had started to adjust to the correct positioning (after being on the ground so long, the foliage was also growing sideways). I also captured this gorgeous bloom photo of Peony 'White Cap' which looked like it had regained some moisture overnight.


Peony 'White Cap' Bloom

Tuesday, March 24, 2020

2020 How to Tell if Your Tree Peony is Happy!


Tree Peony Paeonia Ostii

Not sure if your tree peony is happy? Does it seem to be growing leaves each year, but no flowers? Does it still just have 1 or 2 stems? If so, your tree peony might not be very happy. There's a saying that says tree peonies don't like to be moved, which is probably true for very mature and established tree peonies that are quite large shrubs. However if your tree peony isn't happy, moving it is probably a good idea. If you can't tell if your tree peony is happy, here's a little secret to help you figure it out. Check out the base of your tree peony. Do you see any new growth popping up from the base of it? Not just leaves - but new stems!


Tree Peony 'Shimadaijin'

These new stems won't be woody. They will be fleshy and coming up from the dirt/mulch/base of the plant. The new stems will eventually become woody (by the next year), but when they first come up, they look very herbaceous. Now the appearance and the coloring of these new stems may look different on each tree peony variety. Some new stems may be red, some may be purple, some may be green, and many may exhibit a combination of these colors. The important thing to note is, do you have new stems coming up from the base of the tree peony plant? If you don't and you haven't for more than 2-3 years, then your tree peony is not happy. It is not becoming established in the area you've planted it. Now part of it could be the planting location, but there are many reasons your tree peony might not be happy.


Tree Peony 'Sahohime'

If your tree peony isn't happy after 2-3 years (and it is still alive), I would recommend moving it. If it does not become established, it will eventually die. Where to move your tree peony? Examine the area it's planted in now. Does it receive enough sun? Does it have even moisture throughout the year? Is it planted deeply enough? The biggest keys to making sure your tree peony will grow and establish itself in the landscape are: sun, moisture, and stem access to soil. Let's talk about each of these 3 areas.


Tree Peony 'Yao Huang'

1. Sun - Tree Peonies like a sunny location in the garden, they can take a small amount of shade, but ideally you don't want too much competition from large trees. So sunnier is better. Partially shaded or sheltered by a structure for half the day, like the side of a house, a pergola, a fence, etc. may be beneficial.

2. Moisture - Tree peonies like even moisture, but not too much moisture. The soil should be well draining and rich in nutrients. Planting near a structure also helps conserve soil moisture.

3. Stem Access to Soil - This is most important if you are purchasing a named tree peony variety. (If you are growing tree peonies from seed, you can ignore this one.) Most tree peonies sold today are grafted. (Maybe one day they'll be clones growing on their own roots!) Grafted means you cut a stem from an existing tree peony and merge it with the root of a different peony (usually an herbaceous peony). Since most tree peonies sold commercially are grafted, it is really important that a large part of the stem section of the tree peony be planted under the soil. This will give the tree peony the opportunity to grow its own roots - which is really important for helping the tree peony become established.


Tree Peony 'Angel Emily'

So if you do decide your tree peony isn't happy and decide to move your tree peony, make sure to take into account those three things when replanting it. Try to give your tree peony "the best spot in the garden" not some off to the side, right next to a tree trunk kind of spot. Also it wouldn't hurt to mix in a cup of organic fertilizer into the soil while you are replanting it - and remember - plant it deep! Way deeper than you think. Most people probably try to plant their tree peony with the "roots" underground and the "stem" above ground. I would say you really want to plant it with about half of the stem underground (about 3-4 inches). You really want some of those "buds" on your tree peony stem to be underground and some to be above ground.


Tree Peony 'Angel Emily'

Once you've gotten your tree peony "happy", it will go from just a couple stems to more stems than you can count - like these last 2 photos of Tree Peony 'Angel Emily', which I highly recommend. Tree Peony 'Angel Emily' is an American Peony Society Gold Medal Winner and a Southern Peony Best Performer! :-)

Wednesday, July 18, 2018

2018 How to Take Awesome Photos of Peonies (or Any Other Flower)

So you want to know the secrets of how to take awesome photos of peony flowers? Well, they're not really secrets, but here goes... Here are my top 7 tips for taking awesome peony pics. The stuff on this list isn't really covert, classified information only for professionals, it's more like how to train your eye to look for the right things. Take a look at the two photos that are side by side below. Those are the exact same bloom, taken just moments apart. Want to learn more? Read on...

How to Take Awesome Photos of Peonies

1. Sun - Lighting is the number one factor in getting a great outdoor shot. You can use a flash, but often times, the final product will come out looking artificial and not quite right. The light from your camera's flash tends towards the blue end of white (cool light), whereas the sun tends towards the yellow side of white (warm light). The sun's warm white lighting makes your flower photos seem more natural, more welcoming, and much less artificial! Come out mid morning, mid day, and/or mid afternoon to catch the best sunlight with much fewer shadows. Early morning or late afternoon sun will cast far more shadows on your subject, and/or you may have inadequate lighting altogether, requiring a flash.


Peony 'Lemon Dream'
Photo Taken in Partial Shade

Peony 'Lemon Dream'
Photo Taken in Sun

2. Focus - The second most important factor in obtaining a great flower photo is focus. Focus, Focus, Focus - It's often repeated because it really is that important. If you find the most perfect flower in the whole world, but your camera is focused on the grass or mulch or flower foliage in the background, you might as well have not even taken the photo. You can focus your camera either manually or automatically if you have a DSLR camera or automatically if you have a point and shoot camera, but the key is to focus. Auto focus can work - as long as the subject is what's in focus. If you are using the auto focus feature, most cameras (either point and shoot or DSLR) will have something on the screen that alerts you as to what the camera is focusing on, right before the shot is taken (like a box around the subject in focus or some points that light up on the screen showing what parts of the shot are in focus). Many times if you press the shutter button only halfway down, you have the opportunity to focus (and refocus if it's incorrect) before you depress the shutter button fully to take the shot. Sometimes if you press the shutter all the way down too quickly, the camera is either not focused at all (resulting in a very blurry image) or focused on the wrong thing (resulting in the wrong thing being in focus and a blurry or slightly blurry subject).

3. Flower - Primp it! This may not be a flower exhibition, but if you're going to the trouble to take a nice photo, you want your flower to look its best. If you notice anything on the surface of your flower that will detract from the photo, remove it. There could be debris, dirt, grass, or whatever sitting on your nice flower. Don't leave it on the blossom. Blow it off or pick it off. There could also be ants, bees, worms, or whatever other type of creature on your flower. Unless you are taking a picture with the insects intentionally, then you need to either wait until they're gone or flick them off (if it's safe to do so). There nothing like having a beauty of a flower with a giant fly on one of the petals. Shoo those bugs away!

4. Background - Background is often forgotten when taking photos. Ever see a beautiful flower shot with a cinder block or landscape fabric or irrigation hose or bucket or shovel or (fill in the blank) in the background? (And you just can't help but think how much more beautiful the photo would be without said item in it.) Well, that's what background is all about. It sounds easy - just make sure the background is nice, but we are all guilty (myself included) of taking a photo with a less than stellar background. If you are taking outdoor flower photos, here's a tip to remember: Green is nice, hands and fingers (and arms!) are not. If you must prop a flower up in order to take its picture, please, please, please prop it up with something other than your hand (or arm), preferably something natural and something that does not show in the photo. Sometimes when photographing peonies, I will prop up the flower I want to photograph on another one of the peony's own stems. Sometimes the flowers are really uncooperative. So another option is to use a bamboo stick (or just any other stick from outside) to prop up the flower. Sticks are great because they can be broken and made to any custom length needed. They can also be easily hidden in the foliage. I usually try to make the stick a length that is just tall enough to support the bloom. One end of the stick rests on the ground, the other end rests just underneath the heavy bloom.

5. Angle - This one is a little more advanced, but worth it when you see the results you can create. Ever see a photographer step up on step stool to take a photograph? That step stool is all about the angle. Sometime adjusting your height or your position, relative to the subject, can make all the difference. The thing you are looking for in the angle may vary depending on your subject, but for flowers I am looking for the best symmetry (without sacrificing the Background - see #4). Find the best angle that creates the best symmetry. You many have to crouch down or stand overhead and aim your camera straight down. You may have to walk all around your subject until you find just the right spot to take the photo. Your flower may not be perfectly round, but if you change the angle enough, you may find a shot that makes it look pretty round. Or your flower may be shaped in more of an oval or oblong shape. Then the key is to try to balance the flower in the frame either horizontally or vertically.

6. Timing - This one is sometimes hard for me too (especially since I work 5 out of 7 days of the week), but when you can, try to Take your photos of the freshest flowers - first day blooms if possible. The first (or sometimes second) day flowers will be much more full of life than older flowers on the plant. Also some older blossoms tend to fade. You want to make sure that the flower you are photographing is full of water and not wilted. So this one kind of relates to #1 because you do need good sun for your flowers, but just be aware that some peonies will wilt faster as the day goes on (darker colors like reds, dark pinks, or dark purples). So make sure you try to photograph your darker colored blooms earlier in the day if possible. Also if your area has been especially dry and hot, then it might be a good idea to try to take all of your photographs in the morning to avoid wilted, tired looking peony blooms.

7. Multiples - Finally, take lots of photos! We're not on film anymore. So you can just about take as many photos as you'd like. Memory cards are pretty cheap nowadays. So upgrading to one that will hold more photos shouldn't be a problem. Take multiple shots of the same flower, and I don't mean like 3 or 4, I mean like 10. If you have a shot you really want to get right, take 10 of them. It's not like you have a person or animal for a subject, you have a flower. I don't think it's in a hurry to go anywhere. So you really do have the luxury (that you don't have with people or pets) to Take multiples of the exact same shot. Most of the time (over 50% of the time), when I review them later on my computer, my last shot is my best one. So take your time to get the perfect shot. The reason you're taking so many shots is not to publish all of them, it's to publish the best one. So make sure to take the time later to review and compare your multiple shots to find the best one.

I know this is a lot to remember, but the more you practice these things, the more like second nature they will become. You won't have to intentionally think about each of these things, they will kind of become programmed in. Even on a good day, it probably won't be possible to get every one of the things on this list right for every single shot (see #7 Multiples). Just remember, the most important thing is to have fun! And to share your love of peonies with the world!!!

Saturday, March 24, 2018

2018 How to Lift a Sunken Herbaceous Peony


Sunken Herbaceous Peony

So if you live in the South, and you grow peonies (or try to grow peonies), you probably know that a common problem is peonies not blooming. Why are they not blooming you ask? Most likely because they are planted too deep or do not get enough sun. If your problem is the former (planted too deep), we are going to fix that today! Sometimes even when you plant them at the correct level they sink or get buried over time. It could be that layers of mulch have gotten piled on over the years, creating a peony that is much too far below ground. It could be that there's something going on underground underneath where you peony is planted - animal holes, rotting plant material, or even fire ants! - that have caused the ground to sink underneath your peony. So how can you fix it, and get that peony blooming again?

Lift it up!


Rake Away Mulch from Sunken Peony

The first thing you want to do is to remove the mulch from around your sunken peony. If the problem is too much mulch, you may have quite a bit of mulch to remove. Pull the mulch out in a wide circle around the peony crown to give yourself enough room to dig around your peony without severing any roots (if possible). The bigger/more eyes your peony is, the further away you will need to dig/rake the mulch. After you have removed the majority of the mulch with your rake, use you hands to remove the smaller pieces near the crown, taking care not to damage any buds or small growth on your peony. You don't want to mix the mulch into your soil since the wood will remove nitrogen from the soil as it decomposes. Mulch on top is fine (nature's way), but mulch mixed into the soil is not good.

Use Your Hands to Remove
Remaining Mulch from Sunken Peony


Cut Into the Ground in a Wide Circle Around Sunken Peony

After all of the mulch is removed, you'll want to start digging. Remeber, the bigger/more eyes your peony has, the further away you will need to dig. Don't worry if you sever a storage root or two here or there, your peony should still live, but the less roots you sever the better! Make cuts in the soil with your shovel all around the peony in a wide circle. Once you have made enough cuts, you should be able to lift your peony up with your shovel. There is no need to move it or even remove it from the soil totally. You just need to lift it a little, just enough to get a bit of soil under and around it.

Use Shovel to Lift the Rootball of the Peony


Use Top Soil to Fill in Under and Around Lifted Peony

Once you have your peony rootball lifted a little, you'll want to add some soil under and around your peony. Now if you care enough about your peony to go to all the trouble of lifting it up to help it grow and bloom, put some decent soil under and around it. Don't just put some fill dirt from some other spot in your yard. At least go to the local hardware store and get a $1.50 bag of top soil. You can also get some organic compost as well if you want to spring for a little nicer soil, but plain, old top soil works fine too. Keeping the peony's rootball lifted as best you can pour a little top soil all around the crown of the peony. Use your hands to work a little of the soil underneath the peony and under the sides too. Fill it in all the way around. If your peony crown is mounded up slightly that's fine too, as it will likely settle lower again later. Plus peonies grown mounded up slightly will get better chill in the winter (needed for creating flowers).

Keep Peony Lifted with Shovel While You Add Top Soil Around and Underneath Lifted Peony


Tamp Down Top Soil Around Lifted Peony to Remove Air Pockets

Once you have your new soil pushed under and around the lifted peony's root ball as much as possible, tamp the soil down a bit with your hands or even your feet (lightly) to make sure there are no air pockets around your newly lifted peony. While you are working on your peony anyway, now would also be a good time to add a bit of organic fertilizer or slow release fertilizer around your peony rootball. Sprinkle the recommended amount of fertilizer (check your fertilizer bag for details) on top of the new soil and mix it in a little with your hands.

Sprinkle Some Organic/Slow Release Fertilizer Around Peony

After you've finished fertilizing your peony, replace the mulch lightly. If you had too much mulch on your peony in the first place, you will not want to put all of the mulch back on the peony, just put a portion of it back. Find a new home for that remaining mulch. When applying the mulch on your peony take care to not put too much mulch directly on the crown (growing eyes/buds) of the peony. Once your mulch has been replaced, give your peony a good drink of water to help it resettle into its new surroundings. Now just sit back relax and watch that peony grow. You've just treated it to a day a the spa!

Replace Mulch Around Lifted Peony


Wednesday, November 18, 2015

2015 How to Divide an Intersectional Peony

The topic everyone has been dying to find out about... How to Divide an Intersectional Peony. Some have claimed that it's impossible, that the roots are so different than an herbaceous peony, that if you wait too long its too late. The rumors about dividing this plant have swirled, making dividing these beauties at once a mystery and almost no-no among home gardeners. However these plants are just as easy to divide as herbaceous peonies and perhaps adapt a bit easier to it. And who wouldn't want more of these long lived, easy to grow, and floriferous peonies in their garden?

Intersectional Peony to Be Divided

The first step in dividing your intersectional peony is to remove the ground covering or mulch from the soil surrounding the crown of the plant. You'll want to dig 8-12 inches away from the crown, depending on the size of your plant. I never measure this distance. I mostly eyeball it and use my gut feeling. You don't have to dig up all of the peony's roots. You just need to dig up most of them.

Intersectional Peony with Mulch Removed

After the mulch has been removed, start digging around the plant. I usually just start by making cuts into the soil with the shovel in a circle about 8-12 inches out from the plant. Don't worry if you hear a few roots being cut through. This is just part of the dividing process. However if it feels like you are cutting through lots of roots and the cuts are hard to make, you may be digging too close to the crown. Try making your cuts a little further out.

Begin to Dig Intersectional Peony

After I've made a few shovel cuts into the soil around the plant, I'll go around the plant again and do small test lifts of the rootball to see if the plant is starting to loosen out of the soil. By making these small cuts and doing test lifts, I can see how much more digging I need to do, or if the plant has become loose enough to begin to lift. You can also get an idea as to whether you should be digging closer or farther away from the peony crown.

Test Lift the Intersectional Peony

Once the peony is loose enough to begin lifting, I'll begin gently lifting it out of the soil by hand. If there is one side that lifts higher than the others, I will try to lift that side out first. If you find that the peony is still too buried to begin lifting, you may have to go back dig around it a little more, making few more cuts with your shovel.

Lift Out One Side of the Intersectional Peony

Once you have one side of the peony out of the dirt, you should be able to continue lifting it on that side and gently wiggle the rest of the roots out on the other sides. One or two (or several) of the roots may snap off, and that's okay, as long as you are able to get the majority of them intact. You have most certainly already cut through several of the roots when you were digging the peony anyway. Snapping and cutting off some roots is just part of the process when dividing a peony. So don't worry about those roots, your peony will live - as long as you didn't snap them all off! (Even then it may still survive, it would just take much much longer to reestablish itself and bloom again.)

Gently Shake the Intersectional Peony Until You Can Pull It Out

The next step is to select a place to divide the intersectional peony root. Often there will be a gap or space between some of the small clusters of pink buds. A space like this somewhere near the center would be a good place to start. I like to find a place like this and stick my dividing knife there. Also don't fuss too much about finding the "perfect spot" to divide the peony. Even if you make a mistake and cut a small piece off, that small piece will likely grow anyway, providing there's a small piece of the crown (hopefully containing a pink bud) with a small piece of root attached. Then you'll just have an extra "baby" division. This small division may take longer to grow to full blooming size, but it will be one more intersectional peony plant than you had before!

Find a Good Spot to Divide the Intersectional Peony

Often the intersectional peony roots are too hard to split by hand. I think this attribute is what may have caused the rumors that these peonies are hard to divide. However intersectional peonies are no more hard to divide than herbaceous peonies. They may require an extra tool (like a rubber mallet), but that tool may actually make the job a little bit easier. Use your rubber mallet to tap the dividing knife into the peony root in the place where you've decided to make your first cut.

Use a Rubber Mallet to Divide the Intersectional Peony

I usually do not try to put my dividing knife all the way through the peony's crown. Usually the peony's storage roots are intertwined and growing all around and underneath the peony's crown. Once the dividing knife is halfway or 3/4 of the way through, I will try to wiggle and pull the pieces apart to prevent further damage to the storage roots. If you find that you are unable to pull apart the pieces, then you may need to cut a little further or in a slightly different spot in order to separate the two divisions.

Intersectional Peony First Division Made

After you've made your first division, then you can examine the remaining pieces to see if you can find any other gap or spaces between buds that seem like a suitable place to divide the root even further. Repeat the steps above to cut and carefully pull apart any additional divisions you choose to make.

Find Another Spot to Divide the Intersectional Peony

You can divide your peony into as many pieces as you like. Most professional growers recommend leaving at least 3-4 eyes (the eyes are the pink buds) on each division. Also some growers will sell extra large divisions with at least 7-8 eyes on them. These larger divisions will establish themselves more quickly and are more likely to produce a bloom in their first growing season.
Intersectional Peony Second Division Made

Once you have separated your peony root into as many pieces as you'd like, you're done! Congratulations, you have now successfully divided your intersectional peony! The next thing to do is to figure out How to Plant an Intersectional Peony. May your garden grow and multiply. Good luck! :-)

Intersectional Peony Three Division